


How to protect VDIs when using VMware Horizon View, vShield and GravityZone SVE
Bitdefender GravityZone provides full visibility into organizations' overall security posture, global security threats, and control over its security services that protect virtual or physical desktops, servers and mobile devices. All Bitdefender's Enterprise Security solutions are managed within the GravityZone through a single console, Control Center, that provides control, reporting, and alerting services for various roles within the organization
This article explains how to protect the Virtual Desktop infrastructure (VDI) in a VMware environment with the use of VMware Horizon View, vShield Endpoint and GravityZone Security for Virtualized Environments.
Overview
VMware Horizon View delivers desktop services from your datacenter to enable end-user freedom and IT management and control.
Desktop and application virtualization offers IT a more streamlined, secure way to manage users and provide agile, on-demand desktop services.
Bitdefender GravityZone Security for Virtualized Environments (SVE), is an all-encompassing security solution for virtualized datacenters, protecting virtualized servers and desktops on Windows, Linux, and Solaris systems.
GravityZone SVE offers protection through Security Server and Bitdefender Tools. Security Server is a dedicated virtual machine that de-duplicates and centralizes most of the antimalware functionality of antimalware clients, acting as a scan server. Bitdefender Tools is the component to be installed on the virtual machines you want to protect.
GravityZone SVE can be used in VMware environment with vShield Endpoint. When installed in VMware vSphere environments, SVE takes advantage of the vShield Endpoint integration to provide agentless antimalware introspection. vShield Endpoint offloads anti-malware agent processing to the dedicated Security Server.
Using the vShield Endpoint driver installed on the ESXi host and vShield Thin Agent installed by VMware tools on every VM, the Security Server scans each guest VM, providing an agentless service.
Requirements
To use vShield Endpoint Thin Agent, ensure the guest virtual machine is installed with a supported version of Windows. The versions of the Windows operating systems that are supported for vShield Endpoint are:
- Windows XP (32-bit)
- Windows Vista (32-bit)
- Windows 7 (32-bit, 64-bit)
- Windows 8 (32-bit, 64-bit) (vSphere 5.5 only)
- Windows 2003 (32-bit, 64-bit)
- Windows 2003 R2 (32-bit, 64-bit)
- Windows 2008 (32-bit, 64-bit)
- Windows 2008 R2 (32-bit, 64-bit)
- Windows 2012 (32-bit, 64-bit) (vSphere 5.5 only)
Notes:
- Windows 8 and Windows 2012 are supported guest operating systems in vSphere 5.5, but the ReFS file system is not supported.
- Ensure the Thin Agent and the virtual machine are both either 32 or 64 bit versions. You cannot mix the two versions.
- Windows 2012 R2 and Windows 8.1 are currently not supported Guest operating systems for vShield Endpoint.
- The SCSI controller is only needed for vShield Endpoint version 1.0, ensure the guest virtual machine has a SCSI controller installed for vShield Endpoint 1.0. Later versions of vShield Endpoint do not require a SCSI controller.
Prerequisites
The prerequisites for GravityZone SVE integrated with vShield are:
- ESXi host;
- vCenter Server;
- vShield Manager with vShield Endpoint installed;
- vShield Thin Agent installed in golden image;
- GravityZone SVE service available in Control Center;
- Security Server (VMware with vShield) deployed on each ESXi Host;
To protect Linux VMs, you need to deploy Bitdefender Tools on those systems to offload anti-malware processing to the Security Server.
Using vShield Endpoint Thin Agent only file scanning is available. The user is not notified about possible virus activities or actions taken over different files, such as delete.
Using GravityZone SVE in VMware environment with vShield, you will have to deploy a Security Server on each ESXi Host.
How to protect the VDIs
To protect the VDIs, follow the next steps:
-
Integrate Control Center with vCenter:
- Open GravityZone Control Center.
- Go to the Configuration page.
- Select the Virtualization Tab.
- Click the Add button from the left uppper side of the table and choose vCenter Server from the menu.
.png)
-
Install Security Server on ESXi hosts.
- Go to the Network page and select Virtual Machines service.
- Select the host(s) on which you deploy the Security Server.
-
Right-click to access the contextual menu and select the Tasks > Install Security Server option. The Security Server Installation window appears.
.png)
-
In the General section, select one of the following options:
-
Use common settings for all Security Servers. Using this option while deploying multiple Security Server instances requires the target hosts to share the same storage and have identical hardware specs. In addition, all security servers will be part of the same management network segment and they will be automatically configured by DHCP.
Note: If DHCP is used, make sure all IPs assigned to Security Servers are reserved.
- Configure each Security Server differently. This option allows you to have different values for each setting of the Security Servers.
-
Use common settings for all Security Servers. Using this option while deploying multiple Security Server instances requires the target hosts to share the same storage and have identical hardware specs. In addition, all security servers will be part of the same management network segment and they will be automatically configured by DHCP.
-
Click Next to configure the Security Server instances:
- Name – The name of the Security Server which will appear in VMware Inventory.
- Deploy Container – the vCenter server parent container for the new Security Server.
- Provisioning – the VMDK provisioning type.
- Consolidation – the hardware resources assignation. If Custom level is selected, the administrator can specify the amount of CPU and Memory.
- Set Administrative Password – at the time of the deployment you can change the Security Server root password. If this option is not selected, the root account will have the default password. Later, the only way to change the password is by accessing the VM’s console.
- Timezone – the time zone setting. Clock is automatically synchronized by the NTPD service.
- Network Settings – the VMs management network settings.
.png)
-
After all the configurations are done, if you have different settings for your Security Servers, click Next to proceed with the next instance, otherwise click Save and the deployment task starts.
Note: You can view the deployment task progress in the Network > Tasks page. Check the task status, by clicking the link in the Status column. After the deployment task reaches the status In progress 100%, the new Security Server is powered on and boot process starts. Allow up to 3 minutes for the boot operation to complete. The deployment task will display the Finished status after the management agent on the Security Server synchronizes with GravityZone for the first time, announcing the administrator the new Security Server is operational..png)
-
Create a virtual machine (with Windows 7 for example) with all the programs needed by users.
Note: For VMware environment with vShield, you can use agentless protection. -
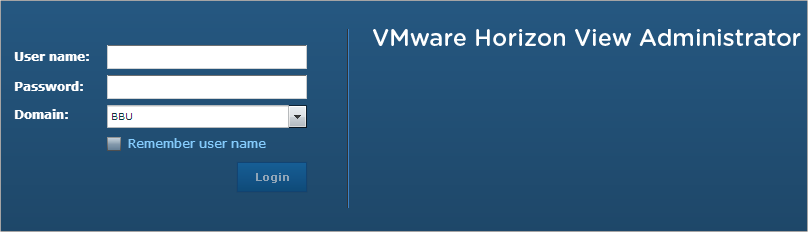
Configure the VMware Horizon View: connect to VMware Horizon View Administrator and create the pools for the VDIs.
-
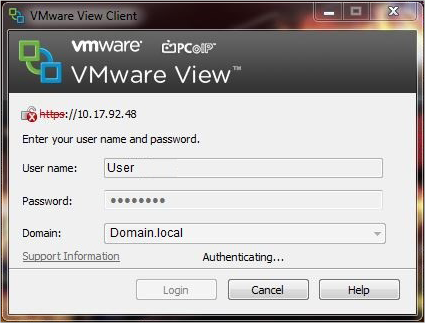
Once VMware Horizon View is configured and a user is trying to connect from a VMware View Client to a VDI, new Virtual Desktops are created.
-
All the VDIs from VMware Horizon View will be protected.

To be sure that the VDIs are protected, you can do the following checks: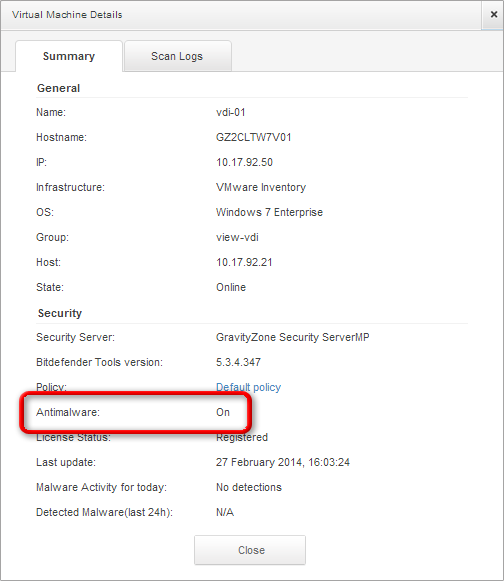
-
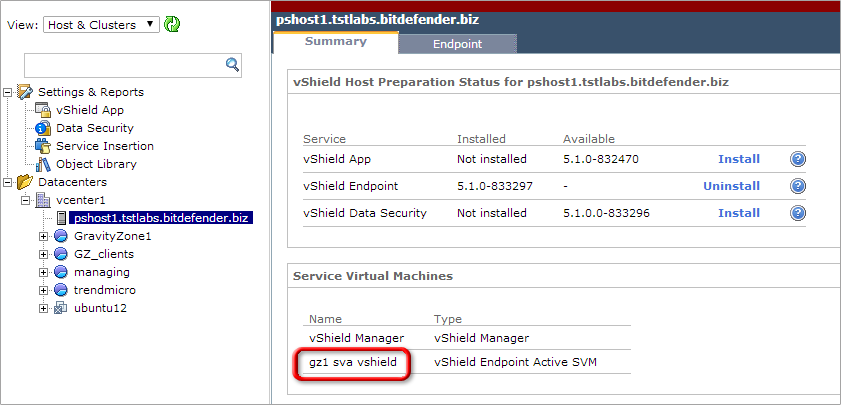
Verify if GravityZone Security Server is registered in vShield manager:
- Open the web console of vShield Manager.
-
On the host's Summary tab, at Service Virtual Machines, you should see the name of the Security Server.
-
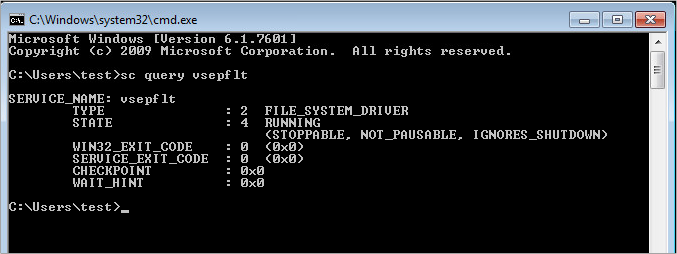
Verify if vShield Thin Agent is running:
- Open a VDI.
-
In a Command Prompt window, run the following command:
sc query vsepflt -
You should have the following output:
-
Verify if VDI is protected with an EICAR test:
- Copy the 68 bytes string, in a .txt file and save it.
- If the VDI is protected, when you will reopen the .txt file, it will be empty. Also, the reports and charts from Control Center Dashboard and Reports page, the charts will show malware presence on the VDI.
-
Verify if GravityZone Security Server is registered in vShield manager:
 Australia:
(+61) 1300 888 829, (+61) 385 956 732
Australia:
(+61) 1300 888 829, (+61) 385 956 732 Canada:
(+1) 647 977 5827, (+1) 647 367 1846
Canada:
(+1) 647 977 5827, (+1) 647 367 1846  Deutschland:
(+49) 2304 9993004
Deutschland:
(+49) 2304 9993004  España:
(+34) 937 370 223
España:
(+34) 937 370 223
 France:
+33(0)184070660
France:
+33(0)184070660  New
Zealand: (+64) 0800 451 786
New
Zealand: (+64) 0800 451 786  Osterreich:
(+49) 2304 9993004
Osterreich:
(+49) 2304 9993004  România:
(+40) 21 264 1777, (+40) 374 303 077
România:
(+40) 21 264 1777, (+40) 374 303 077  Schweiz:
(+49) 2304 9993004
Schweiz:
(+49) 2304 9993004  United
States: (+1) 954 414 9621, (+1) 954
281 4669
United
States: (+1) 954 414 9621, (+1) 954
281 4669  United
Kingdom: (+44) 2036 080 456, (+44) 2080 991 687
United
Kingdom: (+44) 2036 080 456, (+44) 2080 991 687  WorldWide: (+40) 31 620 4235,
(+40) 374 303 035
WorldWide: (+40) 31 620 4235,
(+40) 374 303 035